
Ever thought about turning canned green beans into a light, long-lasting pantry item? This article explores if dehydrating canned green beans is doable and how to do it well. Discover if your favorite canned veggies can become snacks, meals, or emergency supplies by dehydrating them.

Key Takeaways
- Yes, canned green beans can be dehydrated with proper prep steps.
- A dehydrator or oven works for turning canned beans into crunchy snacks.
- Dehydrating reduces waste and creates lightweight storage options.
- Storage tips and common mistakes are covered for successful results.
- Nutritional differences between fresh, canned, and dehydrated beans are explained.
Understanding the Basics of Food Dehydration
Food dehydration makes storing food for a long time easier by removing moisture. This stops bacteria from growing, keeping food fresh. It’s useful for drying vegetables or trying canned food dehydration. Knowing the science behind it helps get better results.
How Dehydration Preserves Food
Dehydration removes water to a level where most bacteria and molds can’t live. This low moisture slows down enzyme activity, which helps prevent spoilage. It’s important to have good airflow and controlled heat to keep the food’s texture and taste.
Types of Foods That Can Be Dehydrated
- Fruits like apples and bananas
- Meats such as jerky and fish
- Herbs and spices for seasoning
- Vegetables, including green beans, bell peppers, and tomatoes
Canned food dehydration works too—draining liquid first helps it last longer. For example, dried green beans stay crisp.
Benefits of Dehydrating Your Own Food
It saves money by preserving large purchases. Dehydrating vegetables uses up extra harvests. Dried foods take up less space than canned or frozen, perfect for small kitchens or emergency supplies. Plus, you avoid added chemicals, controlling what goes into your food.
Can You Dehydrate Canned Green Beans?
Yes, you can dehydrate canned green beans to make dried green beans. These beans are already cooked and in liquid. But, you can dry them to make a light, long-lasting pantry item. The trick is to handle their cooked texture and moisture.
First, drain and rinse the beans well to get rid of extra brine. Dry them with a clean cloth to cut down on moisture. Because they’re soft, they dry quicker than fresh beans. Make sure to follow your dehydrator’s guide for the right drying time. Drying them too long can make them hard and lose their taste.
- Drain canned beans completely to avoid sogginess.
- Spread beans in a single layer on dehydrator trays.
- Check every 30 minutes after 2 hours to prevent over-drying.
The dried green beans will be softer and darker than fresh ones. But, they’re great in soups, stews, or as a quick ingredient. They’re perfect for emergency kits or camp meals. Stored right, they keep their taste and nutrients, making them a handy pantry reuse.
Why You Might Want to Dehydrate Canned Vegetables
Dehydrating canned veggies like green beans has many benefits. It helps with everyday needs and long-term planning. Here’s how it solves common problems:
- Longer Storage: By preserving canned green beans through dehydration, you can keep them for 5–10+ years. This is much longer than the 1–5 years in cans.
- Space Savings: canned food dehydration reduces bulk. Ten cans of green beans can fit in a single quart jar. This saves a lot of kitchen space.
- Emergency Readiness: Dehydrated veggies are light, full of calories, and don’t need refrigeration. They’re great for disaster kits.
- Waste Reduction: Dehydrate almost expired canned goods. Turn them into snacks or meal starters. This reduces waste and saves money.
These advantages match today’s focus on sustainability and self-sufficiency. Whether you’re preparing for storms or organizing your pantry, canned food dehydration has practical solutions. Learning this skill can transform unused canned goods into valuable pantry staples for years.
Equipment Needed for Dehydrating Canned Green Beans
Choosing the right tools is key to success when learning how to dehydrate canned green beans. You can start with a dehydrator, oven, or DIY setup. This depends on your budget and available space. Here’s a comparison of popular options:
| Equipment | Pros | Cons | Cost | Space |
|---|---|---|---|---|
| Nesco FD-75A Dehydrator | Even drying with vertical airflow | Requires plugged-in power | $80–$150 | Counter space |
| Convection Oven | Uses existing appliances | Requires frequent checking | Existing oven | Standard kitchen space |
| Solar Dehydrator | Energy-free option | Weather-dependent | $30–$100 DIY | Outdoor space |
For prep, you’ll need a colander to drain canned beans, paper towels to blot moisture, and airtight containers for storage. For dehydrating tips, use mesh trays to prevent sogginess and avoid overcrowding layers.
Beginners can start with a basic Excalibur 5-Tray dehydrator or use an oven if cost is a priority. Always check beans are fully dried before sealing—moisture traps lead to spoilage. Proper tools turn canned beans into lightweight snacks or pantry staples.
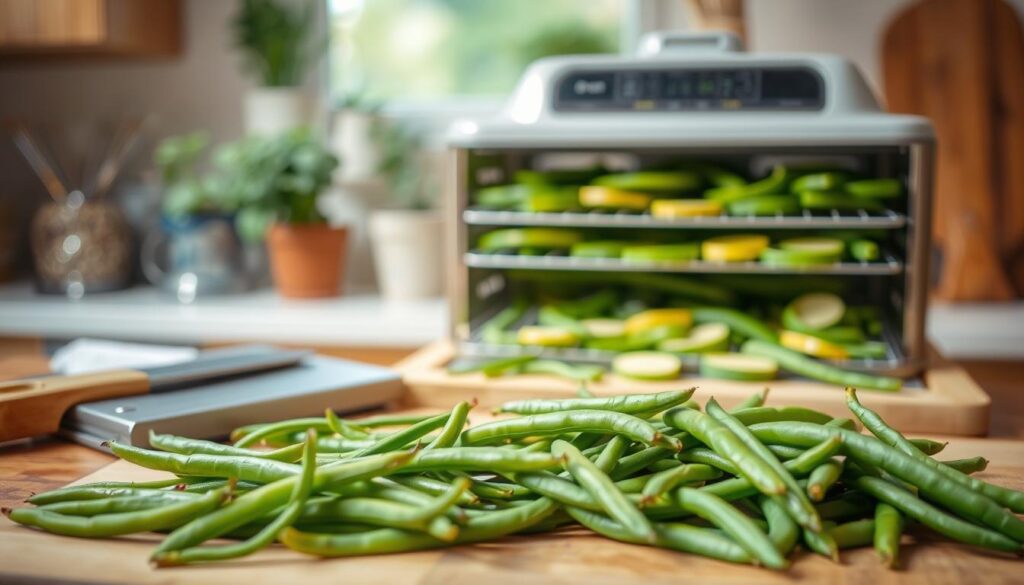
Step-by-Step Process to Dehydrate Canned Green Beans
Learning how to dehydrate canned green beans is easy. Just follow these steps. You’ll turn canned veggies into light, long-lasting snacks or ingredients.
Preparing Your Canned Green Beans
First, drain the beans into a colander. Check for any bad smells or color changes. If you find any, throw them away.
Draining and Rinsing Techniques
- Shake containers gently to loosen packed beans.
- Rinse under cold water 1-2 minutes to reduce sodium levels.
- Pat dry with clean towels after draining to remove surface liquid.
Arranging Beans for Optimal Dehydration
Spread beans in single layers on dehydrator trays. Make sure there’s 1/4-inch space between each piece. Rotate trays every 2 hours for even drying.
Temperature and Timing Guidelines
- Set dehydrator to 125-135°F (52-57°C).
- Process 8-12 hours depending on bean thickness.
- Use ovens with convection settings at 150°F (65°C) for slower batches.
Testing for Complete Dehydration
Check beans by bending them: fully dried beans will snap cleanly. Let them cool completely before storing to prevent moisture buildup.
Common Mistakes to Avoid When Dehydrating Canned Vegetables
Mastering dehydrating vegetables means avoiding common mistakes. Good dehydrating tips keep your food fresh and safe.
Learning from these mistakes can save you time and prevent waste. Here’s how to spot and fix them:
Inadequate Draining Issues
Moisture from cans can lead to mold. Rinse and dry beans with clean towels. This step can shorten drying time by up to 30%.
Temperature Setting Errors
Set your dehydrator to 135°F (57°C). If it’s too high, beans will harden. If it’s too low, bacteria can grow. Always check with a thermometer.
Overcrowding Your Dehydrator
Airflow is essential. Use this spacing guide:
| Mistake | Fix |
|---|---|
| Stacked vegetables | Spread items ½ inch apart |
| Full trays | Use single layers only |
| No tray rotation | Rotate trays every 2 hours |
Proper spacing ensures even drying. It also reduces mold risk by 40%.
Storing Your Dehydrated Green Beans Properly
Keeping your dried green beans fresh for months is easy. First, condition the beans: put them in a jar for 1-2 weeks. Shake it every day to spread moisture evenly. Throw away any clumps that form. This step is vital for preserving canned green beans safely.
| Container | Pros | Cons |
|---|---|---|
| Glass jars | Blocks light, durable | Heavy, may require extra sealing |
| Mylar bags | Lightweight, oxygen barrier | Requires vacuum sealer |
| Vacuum-sealed packs | Long shelf life, space-efficient | Equipment-dependent |
Keep containers in a cool, dark spot. The best temperature is 50-70°F (10-21°C) with less than 15% humidity. Don’t store them in attics or garages where temperatures change a lot. Use oxygen absorbers in sealed containers to slow down oxidation. Also, label each package with the date and what’s inside.
Check your stored beans every month. Look for bad smells, moisture, or color changes. If you find anything suspicious, throw it away right away. When stored properly, dried green beans can last up to 1 year.
Creative Ways to Use Dehydrated Green Beans
Turn your pantry into a kitchen adventure with dried green beans. These light ingredients can be the star of meals at home or on the trail. Here’s how to make dehydrating green beans into tasty dishes for any occasion.
Pack these lightweight bites for outdoor trips: Trail mix: Mix 1/2 cup dried beans with roasted almonds and dried apricots for a snack full of protein. Backpack stew: Rehydrate beans in hot water, then cook with instant mashed potatoes and dehydrated veggies for a quick meal. Quick chili: Add 1/2 cup rehydrated beans to instant chili packets for more fiber and texture.
Add instant flavor to soups with this smart hack: Rehydrate 1/4 cup beans in broth, then mix into minestrone or miso soup for extra bulk. Blend soaked beans into cream of mushroom soup for a veggie boost without lumps. Use 1/3 cup dried beans as a base for homemade veggie broth—no soaking needed when boiling.
Grind beans into powder for hidden nutrition: Add 2 tablespoons powder to smoothies for a green boost without grit. Mix 1/4 cup powder with flour when baking muffins or energy bars. Dust onto roasted veggies or mix into hummus for a fresh, earthy twist.
Turn beans into crunchy nibbles: Roast in the oven with olive oil and smoked paprika for 15 minutes at 300°F. Season with cayenne and sea salt for a spicy trail snack. Pair with store-bought guacamole for a handheld, no-refrigeration dip.
Nutritional Considerations of Dehydrated Canned Green Beans
When we talk about canned food dehydration and preserving canned green beans, keeping nutrients is key. Dehydration removes moisture but saves many nutrients. Here’s how it works:
Nutrient Retention in the Dehydration Process
Minerals like potassium and fiber stay almost the same. Vitamin C goes down by 50%, and B vitamins lose 20-30%. But most minerals and fiber stay the same during processing.
Comparing Fresh, Canned, and Dehydrated Nutrition
| Nutrient | Fresh | Canned | Dehydrated |
|---|---|---|---|
| Vitamin C | 100% | 65% | 45% |
| Fiber | 3g | 3g | 3g |
| Sodium | Low | High | Medium (if rinsed) |
| Calories | 31 cal/100g | 35 cal/100g | 33 cal/100g |
Sodium Content Concerns
Canned beans often have a lot of sodium. Rinsing them can reduce sodium by 30-40%. Here’s what to do:
- Rinse beans in water before dehydration.
- Choose low-sodium canned options when possible.
- Use herbs instead of salt when seasoning.
Follow these tips with the right preserving canned green beans methods. This way, you can enjoy great taste and health.
Comparing Dehydrated Fresh vs. Canned Green Beans
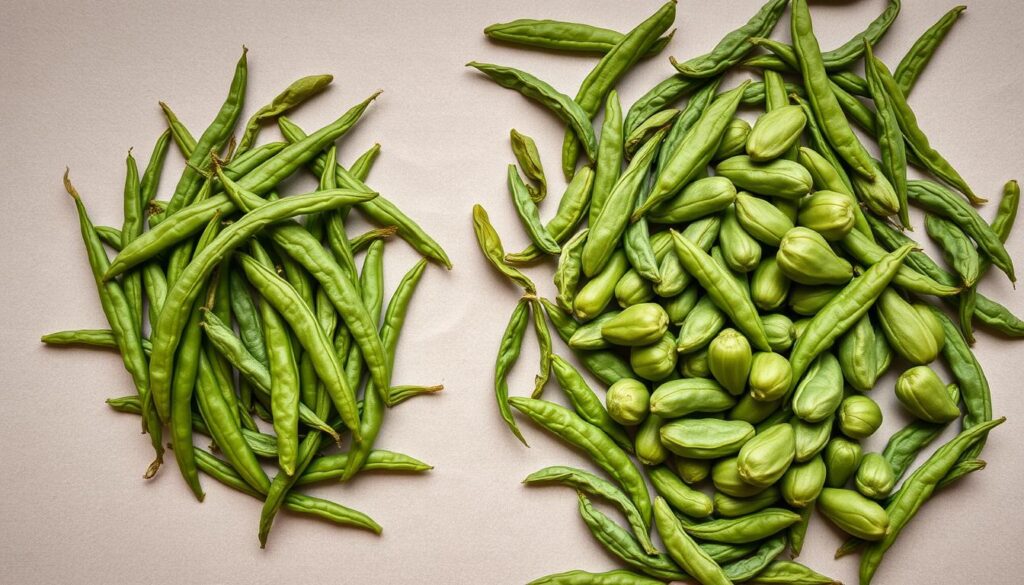
Thinking about using fresh or canned green beans for dehydrating? Let’s compare them:
| Category | Fresh Green Beans | Canned Green Beans |
|---|---|---|
| Preparation Steps | Requires blanching before dehydrating | No blanching needed—use drained beans directly |
| Drying Time | 8–12 hours | 6–8 hours |
| Texture | Crisp and firm when rehydrated | Softer but usable in soups |
| Flavor | Stronger natural taste | Mild, slightly metallic from canning liquid |
| Cost | Lower upfront cost for fresh produce | Convenient for pantry leftovers |
Opt for fresh beans if you want the best taste and texture. Canned beans are quicker but less crunchy. Both are good for dried green beans storage. Fresh beans are great in salads, while canned ones are better for quick soups. Proper storage keeps them fresh for months.
Troubleshooting Problems with Dehydrating Green Beans
Even with the right how to dehydrate canned green beans methods, problems can pop up. These tips help fix common issues fast.
Dealing with Unevenly Dried Beans
Beans drying at different rates? Here’s what to do:
- Rotate dehydrator trays every hour
- Separate beans by size before drying
- Re-dry undercooked areas at 125°F for 2-3 hours
Addressing Moisture Buildup
Moisture trapped inside beans? Here’s how to fix it:
- Lower the temperature to 130°F
- Check airflow by spacing beans 1/4 inch apart
- Stir beans every 2 hours to break up clumps
What to Do if Mold Develops
Mold means unsafe beans. Follow these steps:
- Discard batches with visible mold
- Prevent future mold by:
- Testing beans for 10-12% moisture before storage
- Using airtight containers
- Storing in dry, cool spaces
| Issue | Fix |
|---|---|
| Uneven Drying | Rotate trays hourly and sort beans by size |
| Moisture Buildup | Adjust temp to 130°F and ensure airflow |
| Mold Growth | Discard moldy batches and improve storage practices |
Conclusion
Dehydrating canned green beans is a smart way to make them last longer. When you ask can you dehydrate canned green beans, the answer is yes. You just need to know how to do it right.
Start by draining the beans and arranging them well. Keep an eye on how long they dry. This way, you can make them into light, long-lasting snacks or ingredients for meals.
This method helps save space, cuts down on waste, and prepares you for emergencies.
For success, follow dehydrating tips like not overcrowding and checking for moisture. Fresh and canned beans both have their advantages. Pick what works best for you.
Begin with a small batch to get the hang of it. Once you’re good at it, try dehydrating other canned veggies too.
Remember, the more you practice, the better you’ll get. Dehydrating canned green beans is great for outdoor trips or making meal prep easier. Keep them stored right, test different batches, and use this method in your food preservation routine. Your pantry and adventures will thank you.
FAQ
Can you dehydrate canned green beans?
Yes, you can dehydrate canned green beans. This method extends their shelf life and saves space.
What is the best method for dehydrating canned green beans?
The best method is using a food dehydrator. You can also use an oven or a solar dehydrator.
Do I need to prepare the canned green beans before dehydrating?
Yes, drain and rinse them first. This removes excess sodium and moisture.
How long does it take to dehydrate canned green beans?
It takes 8 to 12 hours at 125-135°F (52-57°C). The time depends on your equipment and desired crispness.
What are the benefits of dehydrating canned vegetables?
Dehydrating canned veggies extends their shelf life. It also saves space and reduces waste.
How can I store my dehydrated green beans effectively?
Use airtight containers like glass jars or mylar bags. Add oxygen absorbers to keep them fresh.
Can I use dehydrated green beans in soups?
Yes, they’re great in soups. Just rehydrate them before adding for better flavor and nutrition.
What common mistakes should I avoid when dehydrating canned green beans?
Don’t forget to drain well. Avoid setting temperatures too high or low. Don’t overcrowd your dehydrator.
Are dehydrated canned green beans safe to eat?
Yes, they’re safe if you dehydrate and store them correctly. They’re a nutritious meal addition.
How do dehydrated green beans compare to fresh or frozen options?
Dehydrated beans have a different texture and taste. Fresh beans taste better, but dehydrated beans are convenient and last longer.
How can I tell if my dehydrated green beans are completely dry?
Do a snap test. If they snap easily, they’re dry enough.